Posted in Felt

Felt cookie monster hanger graduation – Free felt instruction pattern

*Nederlands zie hieronder

We probably all know someone who will graduate from their studies, and how nice is it to give this personalized cookie monster hanger with graduation hat as a gift? I designed it for a friend of mine, who recently received her doctorate degree. Perhaps you wonder why I choose cookie monster for this gift. Well, a couple of years back this friend was my supervisor when I was doing my very first internship in the lab. She always had cookies around in her office and when you were wondering who ate yours, you didn’t have to search for long;) As a goodbye gift I crocheted her a cookie monster jar and filled it with chocolate chip cookies. Unfortunately, I don’t have pictures of this yet anymore, but to honor the amazing memories I had from this time with her in the lab I made this funny cookie monster;)

Of course you don’t need such a reason to also make one! I drew all the pieces and you can download the pdf file below. Follow the step-by-step explanation to start right away. You don’t need a sewing machine for this, but you will need 100% wool felt in blue, black, grey and white, a needle, basic sewing thread, a ribbon, synthetic filling and all purpose glue. Have fun!

Cookie monster graduation hanger instruction:

Step 1: Cut out all the pieces from the pattern (in the picture you don’t see the two black pupils, but obviously you need to cut these too;))
Step 2: Glue the top of the graduation hat to the grey base. Then, pin the hat and the ribbon on one body piece.
Step 3: Hand sew the two body pieces on top of each other by using the blanket stitch. Check out this youtube video for an explanation of this stitch. When you reach the hat, you hand sew a straight line to attach all the pieces properly to the body. Leave open a gap of about 3cm at the bottom and fill up with some synthetic filling. Then, close the bottom with the blanket stitch.
Step 4: Glue the pupils on the eyeballs and glue this on the body. You could potentially embroider the eyes around to firmly attach it. Sew the mouth in the right place.
Step 5: Pin and sew the hands, feet and the cookie on the body as indicated on the picture.
Step 6: Add some red threads to the hat for the finishing touch and your hanger is ready!

*NEDERLANDS

We kennen allemaal wel iemand die binnenkort gaat afstuderen. Hoe leuk is het om dan je zelfgemaakte koekiemonster hanger met afstudeer hoed te kunnen geven als cadeautje? Ik heb hem ontworpen voor een vriendin die recentelijk haar doctoraat heeft behaald. Misschien vraag je je wel af waarom ik een koekiemonster hiervoor heb gekozen. Nou, enkele jaren geleden was die vriendin mijn begeleider tijdens mijn allereerste stage in het lab. Ze had altijd koekjes in haar kantoor en als je je afvroeg waar jouw koekjes waren gebleven, hoefde je niet ver te zoeken;) Als bedankje had ik destijds een koekiemonster pot gehaakt met chocolate chip koekjes. Helaas heb ik hier geen foto’s meer van, maar om de herinneringen aan de tijd met haar in het lab te eren heb ik deze grappige koekiemonster hanger voor haar gemaakt;)

Natuurlijk hoef je niet zo’n reden te hebben om er ook een te maken. Ik heb alle onderdelen getekend en je kunt het pdf bestand hieronder downloaden. Volg de stap-voor-stap beschrijving om direct aan de slag te kunnen gaan. Je hebt geen naaimachine nodig, maar wel 100% wolvilt in blauw, zwart, wit en grijs, een naald, naaigaren, een lintje, synthetische vulling en alleslijm. Veel plezier!

Stap 1: Knip alle onderdelen uit. In de foto zie je niet de zwarte pupillen liggen, maar deze heb je uiteraard ook nodig;)
Stap 2: Lijm de hoed op de grijze basis en speld deze samen met het lintje op 1 lichaamsdeel.
Stap 3: Naai met de hand de twee lichaamsdelen aan elkaar door gebruik te maken van de festonsteek. Zie deze youtube video voor een uitleg van de steek. Wanneer je bij de hoed komt, naai je een rechte lijn en zorg je ervoor dat alle onderdelen goed vastzitten. Laat een gat open van ongeveer 3 cm aan de onderkant en vul je hanger met synthetische vulling. Naai dan het gat dicht met de festonsteek.
Stap 4: Lijm de ogen op het lijfje. Je kunt de oogballen ook met een klein steekje rondom vastzetten. Naai de mond op de juiste plek.
Stap 5: Speld de handen, voeten en het koekje zoals aangegeven op de foto en naai ze vast.
Stap 6: Bevestig wat rode draadjes op de hoed om hem helemaal af te maken.

Posts that might be of interest to you/ Posts waar je mogelijk ook in geïnteresseerd bent:

Posted in Felt

My felt bear- Felt pattern review

*Nederlands zie hieronder

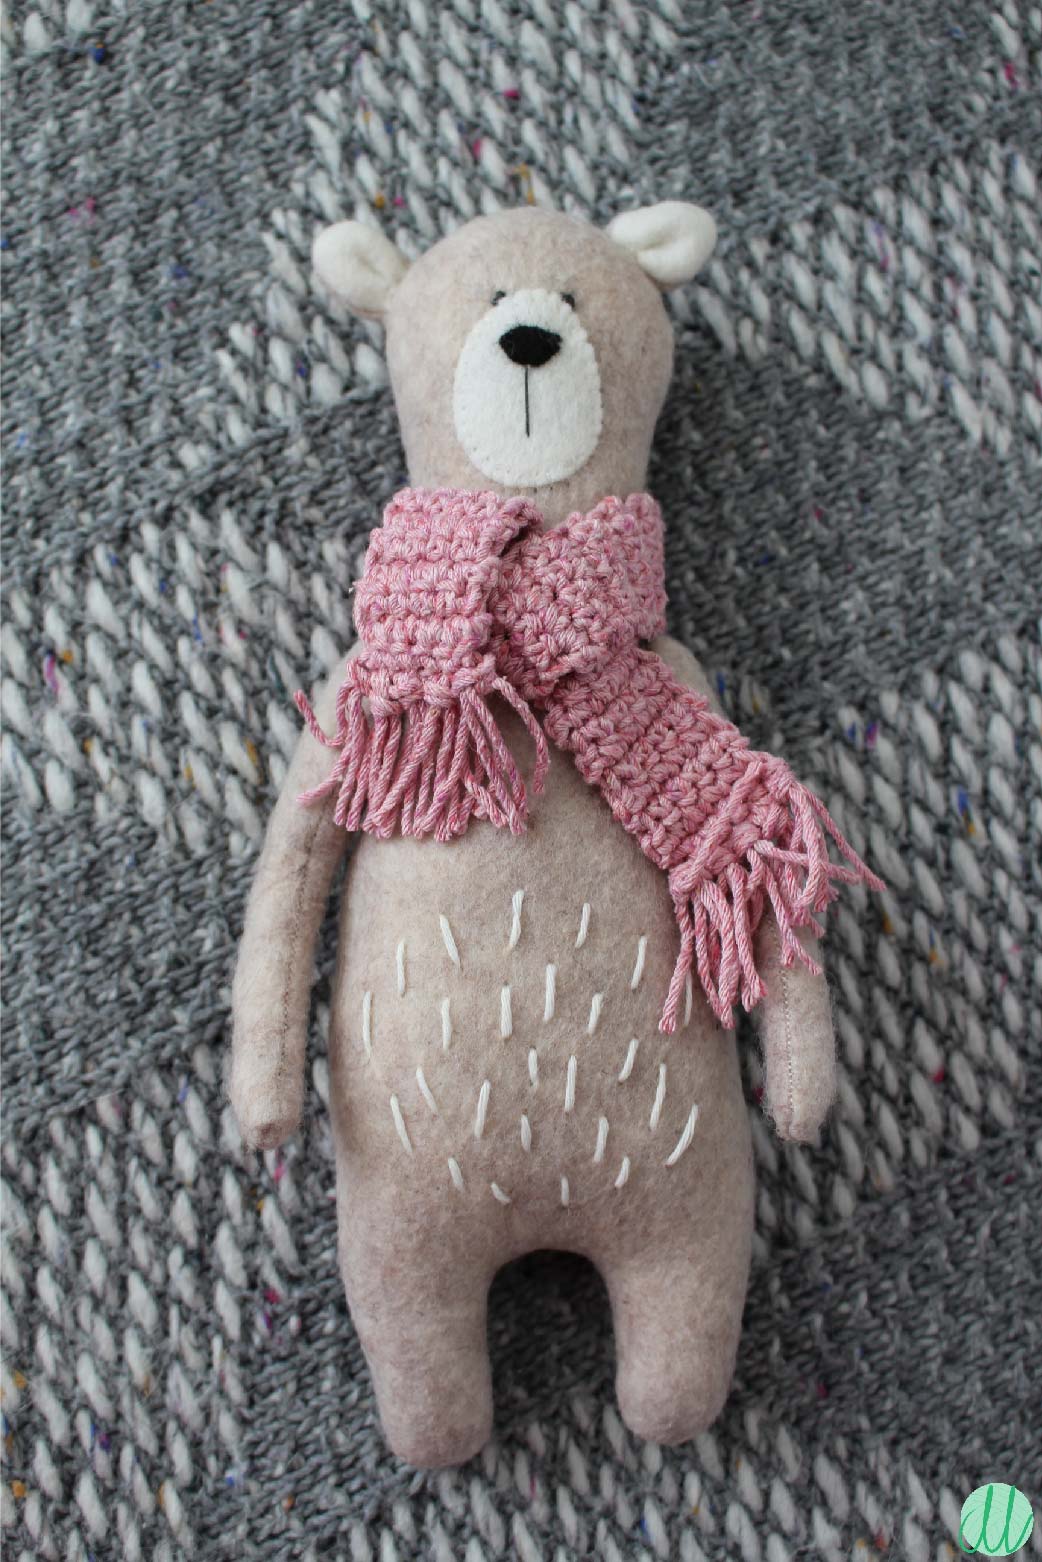
In the last few weeks I have been experimenting a bit with felt. I’m currently working on a big project that will be a present for the birthday of my niece, who will turn 6. You need to be a bit more patient, but I will share it with you soon! To give you already a bit of a taste of what I have been doing lately, I wanted to share my bear with you.

As you may know, we previously shared our free felt patterns with you (for mini alpaca’s here, and for an amigurumi elephant here). This bear however, was inspired on the sewing pattern of AmuruToys, which you can buy here. Just to make it clear, I did not use this pattern, but I drew my own pattern based on the idea of the bear. For this reason, I would like to refer to AmuruToys if you would like to make a similar bear yourself too. Consider this post your inspiration:)

Materials

  • 1 sheet 20×30 cm 100% wool felt, Meaningful Crafts Truefelt 1-1.2mm colour 642 light beige (available here)
  • Small piece of 100% wool felt, Meaningful Crafts Truefelt 1-1.2mm colour 645 ecru (available here)
  • Small piece of 100% wool felt, Meaningful Crafts Truefelt 1-1.2mm colour 540 black (available here)
  • Synthetic filling
  • 10 grams pink 100% cotton yarn for crochet needle 2.5mm (scarf)
  • Leftover ecru 100% cotton yarn for crochet needle 2.5mm (belly)
  • sewing appliances

I drew the bear pieces on an A4 paper sheet and added about 0.5cm extra all around as seam allowance. All the pieces were sewn with the sewing machine and flipped inside out. I filled the pieces firmly with synthetic filling and closed the pieces by hand, using the invisible stitch (see this youtube video).

The scarf was made as follows: set up 6 chains + 1 turning ch. Crochet 6 sc + 1 turning ch. Repeat and keep going back and forth till you reach the length you wish to have (make sure you can make a knot in the scarf). At the endings, I knotted short pieces of yarn for a more playful effect.

Working with felt is actually not that difficult and much faster than crocheting an amigurumi! I would really recommend everyone to give it a try once. Just make sure you buy high quality (preferably 100% wool) felt, so your amigurumi will stay nice for a very long time. Check out our other felt project posts for more inspiration and tips!

Nederlands

In de laatste weken heb ik wat geëxperimenteerd met vilt. Ik ben momenteel bezig met een groot project welke een cadeau zal zijn voor mijn nichtje die binnenkort 6 wordt. Je moet nog even geduld hebben, maar ik zal het binnenkort met jullie delen! Om je al een beetje een idee te geven wat ik de laatste tijd aan het doen ben, wilde ik vandaag mijn beer met jullie delen.

Zoals jullie misschien wel weten, hebben wij eerder gratis vilt patronen met jullie gedeeld (voor mini alpaca’s zie deze post, voor een amigurumi olifant zie deze post). Deze beer was geinspireerd op een patroon van AmuruToys en daarom wil ik graag naar dit patroon refereren als je ook een vergelijkbare beer wilt maken (patroon hier beschikbaar). Ik heb dit patroon dus niet gebruikt, maar mijn eigen patroon getekend met de beer als inspiratiebron. Gebruik deze post dus ook als inspiratie:)

Materialen

  • 1 vel 20×30 cm 100% wol vilt, Meaningful Crafts Truefelt 1-1.2mm kleur 642 licht beige (hier beschikbaar)
  • Klein stukje 100% wol vilt, Meaningful Crafts Truefelt 1-1.2mm kleur 645 ecru (hier beschikbaar)
  • Klein stukje 100% wol vilt, Meaningful Crafts Truefelt 1-1.2mm kleur 540 zwart (hier beschikbaar)
  • Synthetische knuffelvulling
  • 10 gram roze 100% katoen voor haaknaald 2.5mm (sjaal)
  • Restje ecru 100% katoen voor haaknaald 2.5mm (buik)
  • Naaigaren en gereedschappen

Ik heb de beer uitgetekend op een A4 vel en 0.5cm extra als naadtoeslag gerekend. Alle onderdelen zijn met de naaimachine rondom genaaid (laat een gat van ongeveer 2-3cm open) en vervolgens binnenstebuiten gekeerd. Ik heb de onderdelen stevig opgevuld met knuffelvulling en met de onzichtbare steek met de hand dichtgenaaid (zie deze youtube video voor uitleg).

De sjaal heb ik als volg gehaakt: zet 6 lossen op + 1 keerlosse. Haak 6v op de lossen + 1 keerlosse. Haak heen en weer totdat je de gewenste lengte hebt bereikt. Zorg ervoor dat je een knoop in de sjaal kan leggen. Ik heb daarna franjes gemaakt door korte stukjes katoen draad aan de uiteindes te knopen voor een wat speelser effect.

Het werken met vilt is eigenlijk helemaal niet zo moeilijk en veel sneller dan het haken van een amigurumi bijvoorbeeld. Ik raad jullie zeker aan om het een keer een kans te geven. Investeer wel in hoog kwaliteit vilt (liefst 100% wolvilt), zodat je nog veel plezier van je amigurumi kunt hebben en hij niet gelijk uit elkaar valt. Zie ook onze andere posts over het werken met vilt voor nog meer inspiratie en tips!

Posts that might be of interest to you/ Posts waar je mogelijk ook in geïnteresseerd bent:

Posted in Felt

Mini felt alpacas – Free felt pattern

*Nederlands zie hieronder

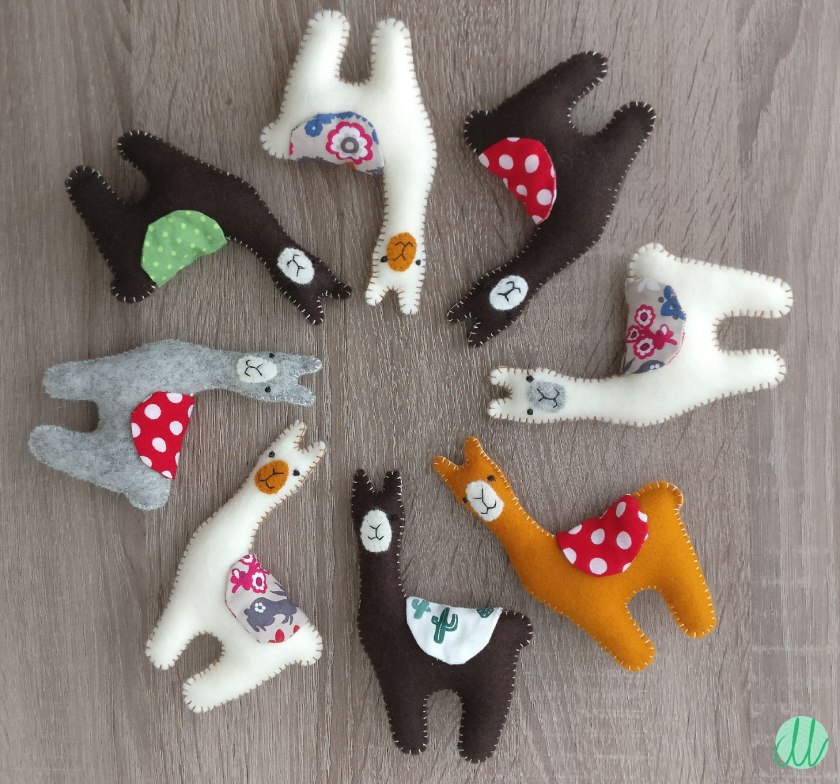
These cuties played an important role on my wedding. Every kid who attended the wedding received one mini alpaca, as a reminder of this special day in the mountains of Italy. Of course they had to be festive, but I still wanted to stick to the natural colours alpacas have. That’s why I picked different shades of creme and brown colours for the fur. The saddles are made with different colourful fabrics. This post is a free pattern to make your own mini alpaca including a pdf pattern with the shapes. Please Tag Get Unraveled or refer to our blog if you make an alpaca that you share on social media. This will support us in keep making free patterns for you!

Materials

  • Deer Brown 100% woolen felt from Meaningfulcrafts, Truefelt 1-1.2mm colour 610
  • Ecru 100% woolen felt from Meaningfulcrafts, Truefelt 1-1.2mm colour 645
  • Dark brown 100% woolen felt from Meaningfulcrafts, Truefelt 1-1.2mm colour 536
  • Light grey 100% woolen felt from Meaningfulcrafts, Truefelt 1-1.2mm colour 640
  • Synthetic filling (you can buy it here)
  • Black/brown/white sewing dread with needle
  • Scrap of colourful cotton fabric
  • Sewing machine

Pattern

Step 1 Print the template of the mini alpaca and cut out the pieces. You can download the template below:

Place the pieces over the felt and pin them properly. Put aside the piece of the saddle.

Step 2 Cut out all the pieces. You need 2x the body of the alpaca and 1x the snout.

Step 3 Align the two body pieces and sew them together by hand stitching. Use the stitch in this video. Leave a gap of about 5cm over at the back of the alpaca. Fill the alpaca with synthetic fiber fill and then close the gap following the same stitch as before.

Step 4 Hand embroider the snout onto the head in this position.

Step 5 Hand embroider the eyes, nose and mouth as indicated in the picture.

Step 6 Cut out two pieces of sadle from a scrap of cotton fabric. Place the right sides onto each other and sew around about 0.5cm from the border (in the pdf indicated with broken lines). Leave a gap of about 2cm. Flip the saddle, so the right side is outside. Press with the iron and close the gap bij handstitching.

Step 7 Sew the saddle with a few small stitches onto the body. Your mini alpaca is ready!

NEDERLANDS

Deze schattige mini alpaca’s hebben een belangrijke rol gespeeld op mijn bruiloft. Elk kind die aanwezig was kreeg een mini alpaca, als herinnering aan deze bijzondere dag in de bergen van Italië. Natuurlijk moesten ze er feestelijk uit zien, maar ik wilde wel kleuren gebruiken die natuurlijk zijn voor alpaca’s. Daarom heb ik verschillende tinten bruin en creme gekozen. De zadels zijn gemaakt van katoen stof. Deze post bevat een gratis patroon voor het maken van je eigen mini alpaca. Wij stellen het zeer op prijs als je ons ‘Get Unraveled’ tagt of doorverwijst naar onze blog wanneer je je eigen alpaca deelt op social media. Dit ondersteunt ons zodat we gratis patronen voor jullie kunnen blijven maken!

Materialen

  • Ree bruin100% wol vilt van Meaningfulcrafts, Truefelt 1-1.2mm, kleur 610
  • Ecru 100% wol vilt van Meaningfulcrafts, Truefelt 1-1.2mm, kleur 645
  • Donkerbruin 100% wol vilt van Meaningfulcrafts, Truefelt 1-1.2mm, kleur 536
  • Lichtgrijs 100% wol vilt van Meaningfulcrafts, Truefelt 1-1.2mm, kleur 640
  • Synthetische vulling (je kunt het hier kopen)
  • Zwart/bruin/wit naaigaren met naald
  • Restje katoen stof
  • Naaimachine

Patroon

Stap 1 Print het patroon van de mini alpaca en knip de delen uit. Je kunt hier het patroon downloaden:

Plaats de delen over het vilt en speld ze vast. Leg het patroon voor het zadel even opzij.

Stap 2 Knip alle viltdelen uit. Je hebt 2x het lichaam van de alpaca nodig en 1x de neus.

Stap 3 Overlap de twee lichaamsdelen en naai ze met de hand vast. Gebruik de steek die in deze video wordt uitgelegd. Laat een gat van ongeveer 5cm aan de rugzijde open. Vul de alpaca licht op met synthetische knuffelvulling en sluit het gat daarna met dezelfde steek als waar je mee begonnen bent.

Stap 4 Naai de neus aan het lichaam vast op de positie die is aangegeven op de foto.

Stap 5 Naai de ogen, neus en mond zoals aangegeven op de foto.

Stap 6 Knip de delen van het zadel uit van het katoen stof. Plaats de goede zijden van het stof tegen elkaar en naai 0.5cm vanaf de rand rondom (aangegeven met stippellijnen op het patroon). Laat een gat van 2cm open. Draai de zadel binnenste buiten en pers met het strijkijzer. Naai het gat met de hand dicht.

Stap 7 Naai het zadel met een paar steekjes aan de alpaca vast. Je mini alpaca is klaar!

Our posts may contain affiliate links. These help us to maintain the website and to keep designing awesome patterns for you! Would you like to support us? Clicking on the affiliate links and purchasing an item is the best way to do this. We are very grateful! Go to our ‘About’ page for more information.

Posts that might be of interest to you/ Posts waar je mogelijk ook in geïnteresseerd bent:

Posted in Felt

Cute felt elephant – Free felt project instruction

*Dutch see below

I’m very excited to share with you my very first self-designed felt elephant! It’s only the third time that I ever made something with felt (check out my post about the felt snail for my first project that I made) and I really feel like there is so much more to explore with it! A colleague of mine got a new job recently and she is crazy in love with elephants. It was a perfect opportunity for me to give her this cute felt elephant as goodbye present. The complete instruction for this elephant is written below, following the step-by-step procedure in the pictures. Let me know if some steps are unclear, I’m happy to improve the instruction!

Step-by-step instruction for the felt elephant

Materials

  • 100% wool felt, Meaningul Crafts TrueFelt 1-1.2mm colour 640 light gray (available here)
  • 100% wool felt, Meaningful Crafts TrueFelt 1-1.2mm colour 556 white (available here)
  • Leftover 100% wool felt, Meaningful Crafts TrueFelt 1-1.2mm colour 633 red (available here)
  • Two 6 mm English glass doll eyes (I bought them here)
  • Leftover cotton/wool yarn (tail)
  • Synthetic filling (you can buy it here)
  • White and red sewing dread with needle
  • Sewing machine

Step 1 Print the template of the elephant and cut out the pieces. You can download the template below:

Step 2 Cut out 2x the elephant shape in grey felt, 4x the ear shape (2x white and 2x grey) and 1x the belly in white felt. Overlay one grey and one white piece for every ear and pin them. Overlay the two elephant pieces and pin them. Place the belly piece aside for now.

Step 3a With a sewing machine, sew the back and the head of the elephant. Do not sew the legs and the opening as indicated in the picture! Sew the ears with the sewing machine, leaving the side of the ear where it will be attached to the head, open.

Step 3b Place the belly pieced under the legs and sew around with the sewing machine. Pay attention that you only sew through two layers of felt! You should still have the opening where the tail comes open. If you have troubles sewing at the front part facing the head, leave a gap of 1 cm. You can close this by hand later. Make small cuts all around the elephant where there are curvings. Don’t cut through the sewing.

Step 4 Flip all the pieces inside out. Use a pencil or chopstick to unfold the corners and the nose completely.

Step 5 Fill the elephant with synthetic filling. Close all the gaps with an invisible hand stitch. This youtube video explains very well how that works.

Step 6a Sew the glass doll eyes on the head and firmly knot them from side to side in such a way that they sink a bit within the felt. Place the ears on the head and handsew them with an invisible stitch. Cut out two small red circles (size as you wish, mine are about 0.5cm in diameter) and hand sew them on the elephant.

Step 6b Make a braid of leftover yarn for the tail. For this elephant I cut out three strands of 12cm each. First take them through the top part of the body, then use 3 x 2 strands (so the three strands are folded double) to make a braid. Make a knot at the ending and cut the tips of leftover yarn.

Step 6c The legs of the elephant might point out a bit to the sides. To solve this, sew them together directly under the body with a small stitch. Your elephant is finished!

NEDERLANDS

Met veel plezier deel ik mijn eerste zelf ontworpen vilten olifant project met jullie! Het is pas de derde keer dat ik iets met vilt heb gemaakt (in deze post laat ik jullie mijn eerste viltproject, een slak, zien) en ik heb het gevoel dat er nog zoveel meer te ontdekken is met vilt! Een collega van mij heeft recentelijk een nieuwe baan gekregen en zij is gek op olifanten. Dit was voor mij dus de perfecte kans om haar dit schattige olifantje als afscheidscadeautje te geven. De complete instructie is hieronder beschreven aan de hand van de stap-voor-stap foto’s. Laat het mij weten als er stappen niet duidelijk zijn. Ik pas de instructie met plezier aan!

Materialen

Stap 1 Print de template voor de olifant uit en knip de delen uit. Je kunt hieronder het template downloaden:

Stap 2 Knip de olifant 2x in grijs vilt uit, de oren 4x in grijs en wit vilt (2x wit en 2x grijs) en knip het buikje 1x uit in wit. Overlap 1 grijs met 1 wit oor en spelt deze vast. Doe hetzelfde voor het andere oor. Speld de twee delen voor de olifant ook vast. Leg voor nu even het buikje opzij.

Stap 3a Naai met de naaimachine de rug en het hoofd van de olifant rondom. Naai niet de poten en de opening aan de achterkant, zoals aangegeven met de speldjes in de foto! Naai de oren rondom, maar laat de opening wat aan het lijfje vastgemaakt wordt, open.

Stap 3b Speld het buikje onder de poten en naai met de naaimachine volledig rondom. Let erop dat je alleen foor twee lagen vilt gaat! De opening waar de staart komt aan de achterkant moet nu nog steeds open zijn. Als je problemen hebt met het naaien van het voorste gedeelte bij het hoofd, laat dit dan voor ongeveer 1cm open. Dit kun je later met de hand dicht naaien. Knip kleine inkepingen in het vilt waar er rondingen zijn. Knip niet door het draad heen.

Stap 4 Keer alle delen binnenstebuiten. Gebruik een potlood of een stokje om alle hoekjes en de slurf goed uit te duwen.

Stap 5 Vul de olifant met synthetische knuffelvulling. Maak alle openingen goed dicht met een onzichtbare hand steek. Deze youtube video laat goed zien hoe dit moet.

Stap 6a Naai de glazen oogjes op het hoofd en trek deze goed aan van de ene zijde van de olifant naar de andere zijde, zodat ze een beetje wegzinken in het vilt. Plaats de oren op het hoofd en naai ze met de hand vast. Knip twee rode cirkels (grootte die je wilt, de mijne zijn ongeveer 0.5cm in diameter) en naai ze met de hand op de olifant.

Stap 6b Maak een vlechtje voor de staart. Voor dit olifantje heb ik 3 strengen van 12cm geknipt en ze door de bovenkant van de rug gehaald. Vervolgens heb ik 3x 2 strengen (de drie strengen zijn dus dubbelgevouwen) gebruikt om een vlechtje te maken. Maak een knoopje onderin en knip de uiteindes op de gewenste lengte af.

Stap 6c De poten van de olifant kunnen een beetje naar buiten staan. Om dit op te lossen, naai ze direct onder de buik met een klein steekje aan elkaar vast. Je olifant is nu klaar!

Our posts may contain affiliate links. These help us to maintain the website and to keep designing awesome patterns for you! Would you like to support us? Clicking on the affiliate links and purchasing an item is the best way to do this. We are very grateful! Go to our ‘About’ page for more information.

Posts that might be of interest to you/ Posts waar je mogelijk ook in geïnteresseerd bent: